Wainscoting: A Formal Affair

Standard

“Welcome to my house. Come freely. Go safely;

and leave something of the happiness you bring.” —-Bram Stoker

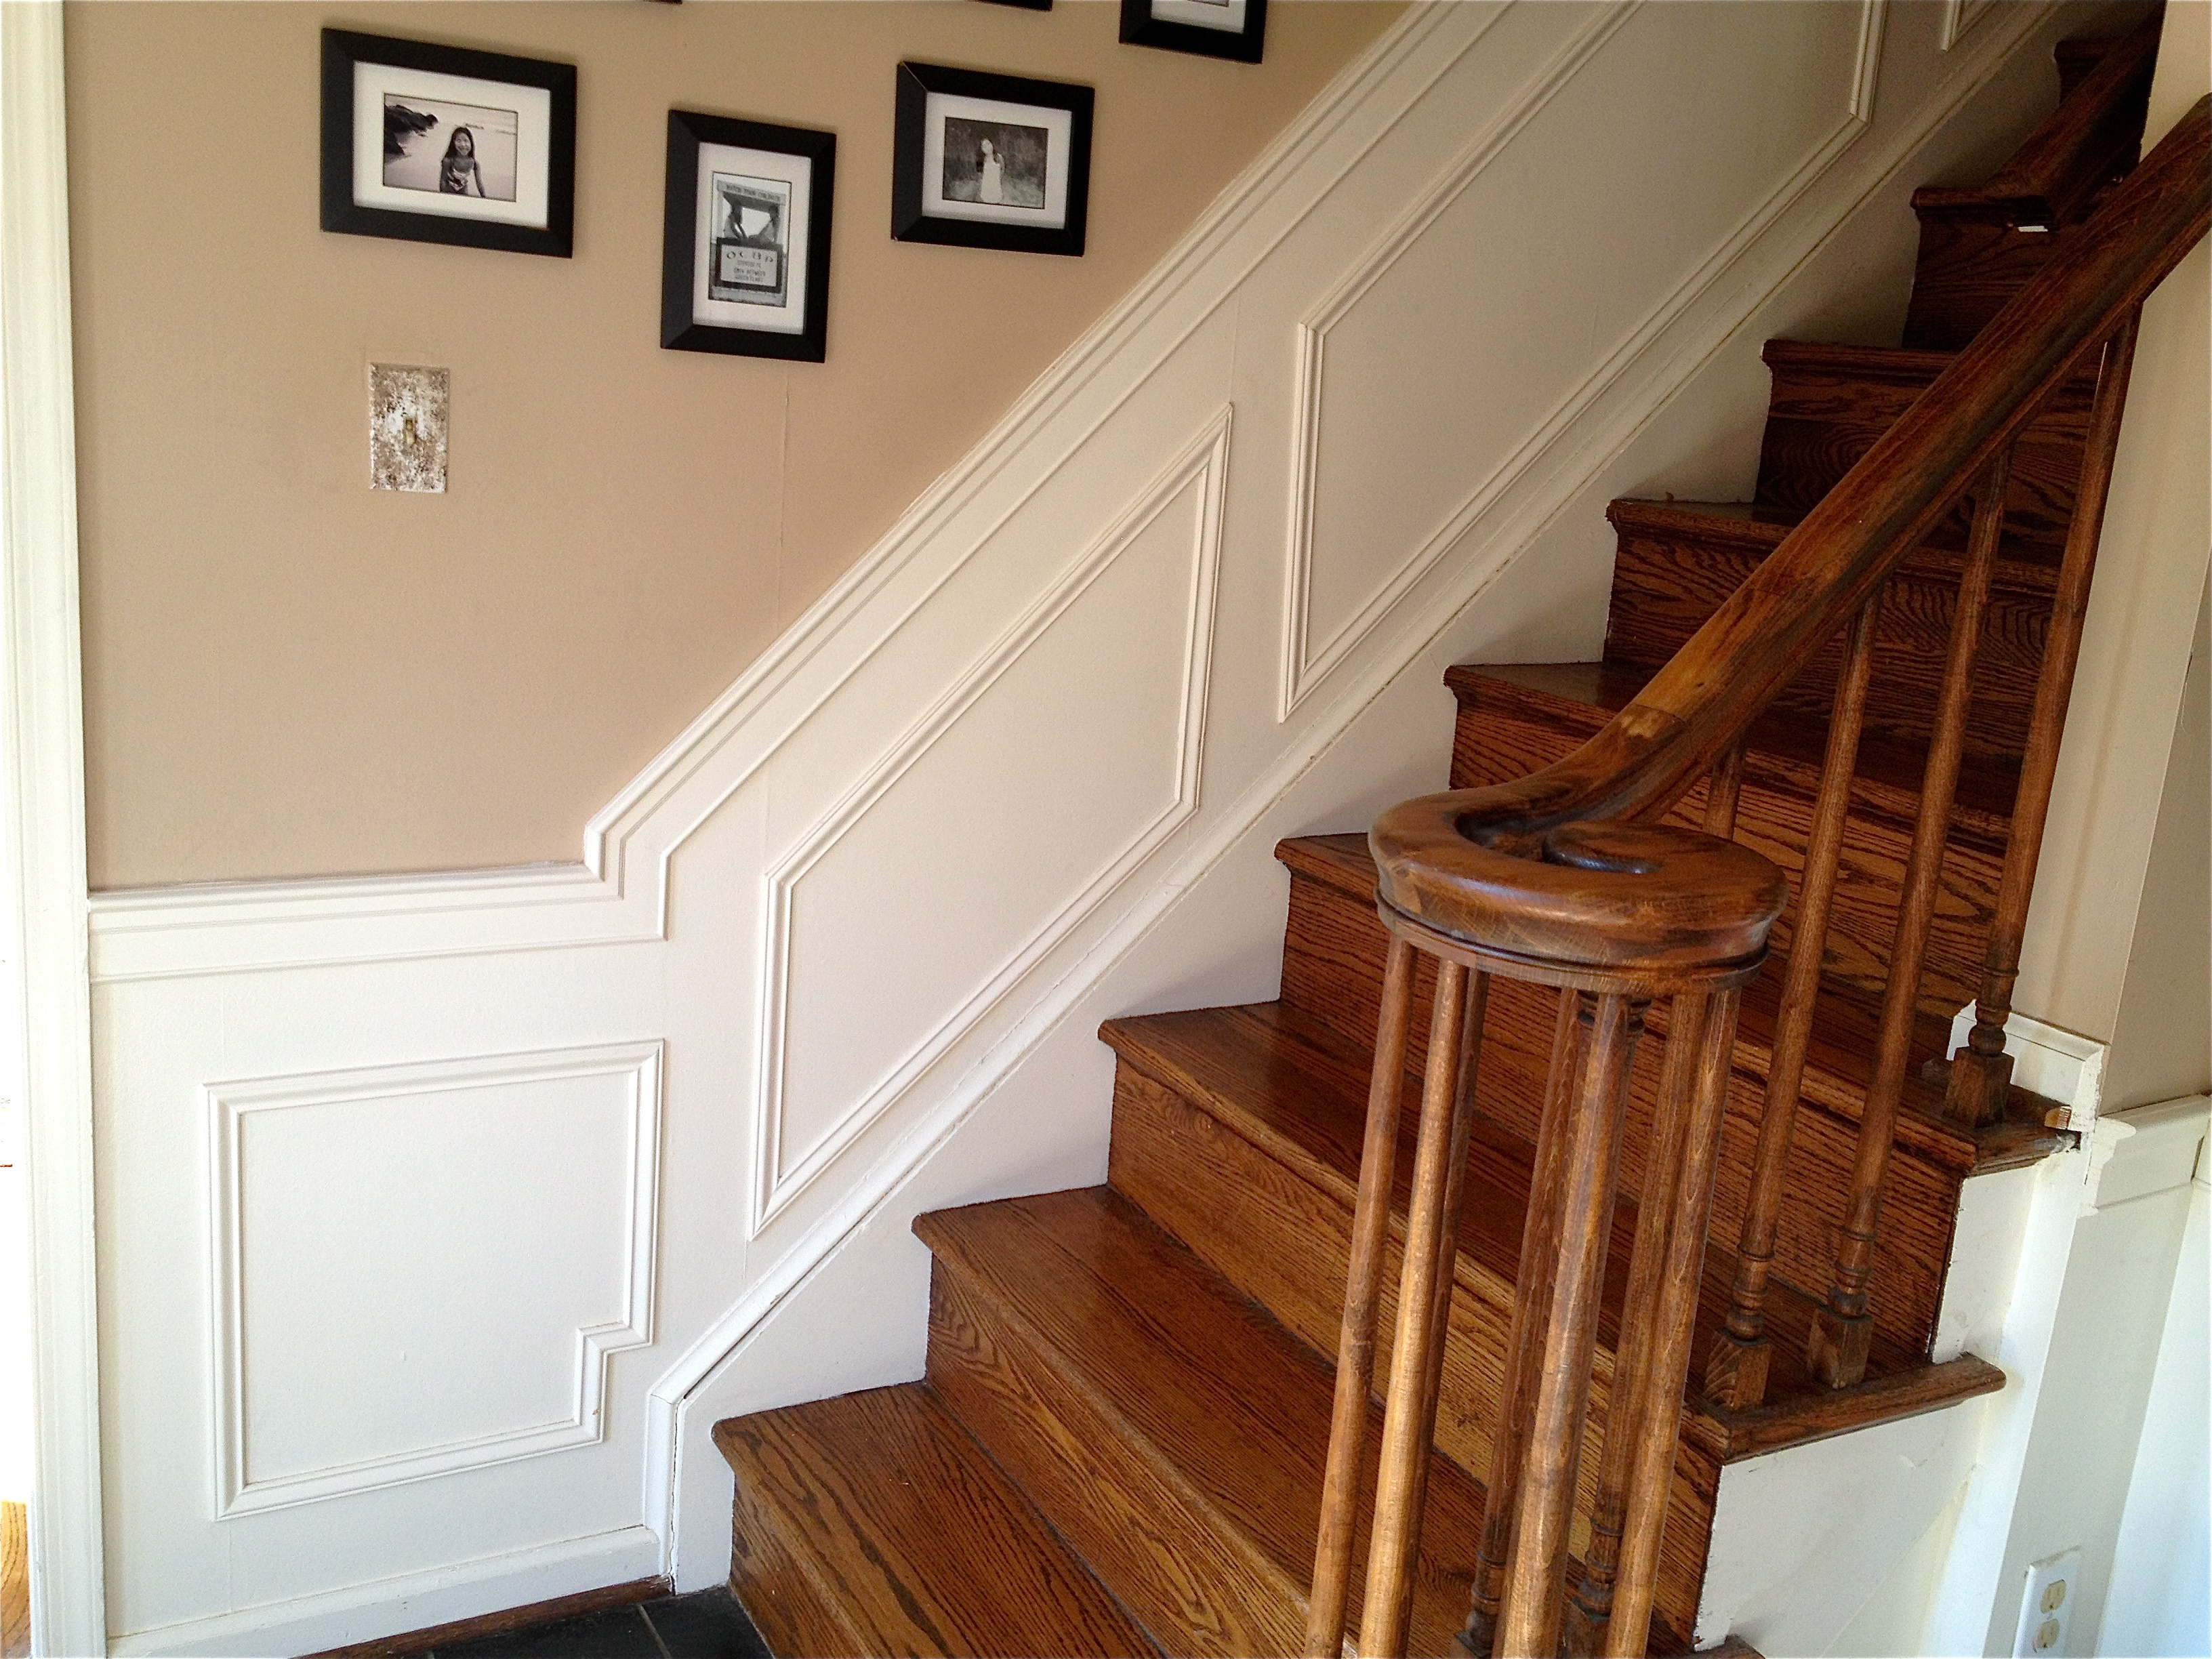
Your foyer offers the first impression of your home to all who enter. And mine was really boring. Not exactly the vibe I wanted to present to our holiday guests. Wainscoting offered the perfect solution, adding a formal flair and breaking up the monotony of the walls.

photo

I cheated a bit with my wainscot, opting for a simple method to create the look of the formal wood panels. First, I nailed chair-rail moulding on the walls 36 inches from the floor.  Be sure to use a level—a crooked chair rail can make you dizzy! Then using some rudimentary math, I determined the size and quantity of “boxes” needed for each wall, taking care to keep a uniform space between the boxes as well as between the chair-rail and the bottom trim. I used a level to draw the boxes on the wall with pencil so I could judge how they’d look and make any adjustments before I started cutting the wood.

photo_2

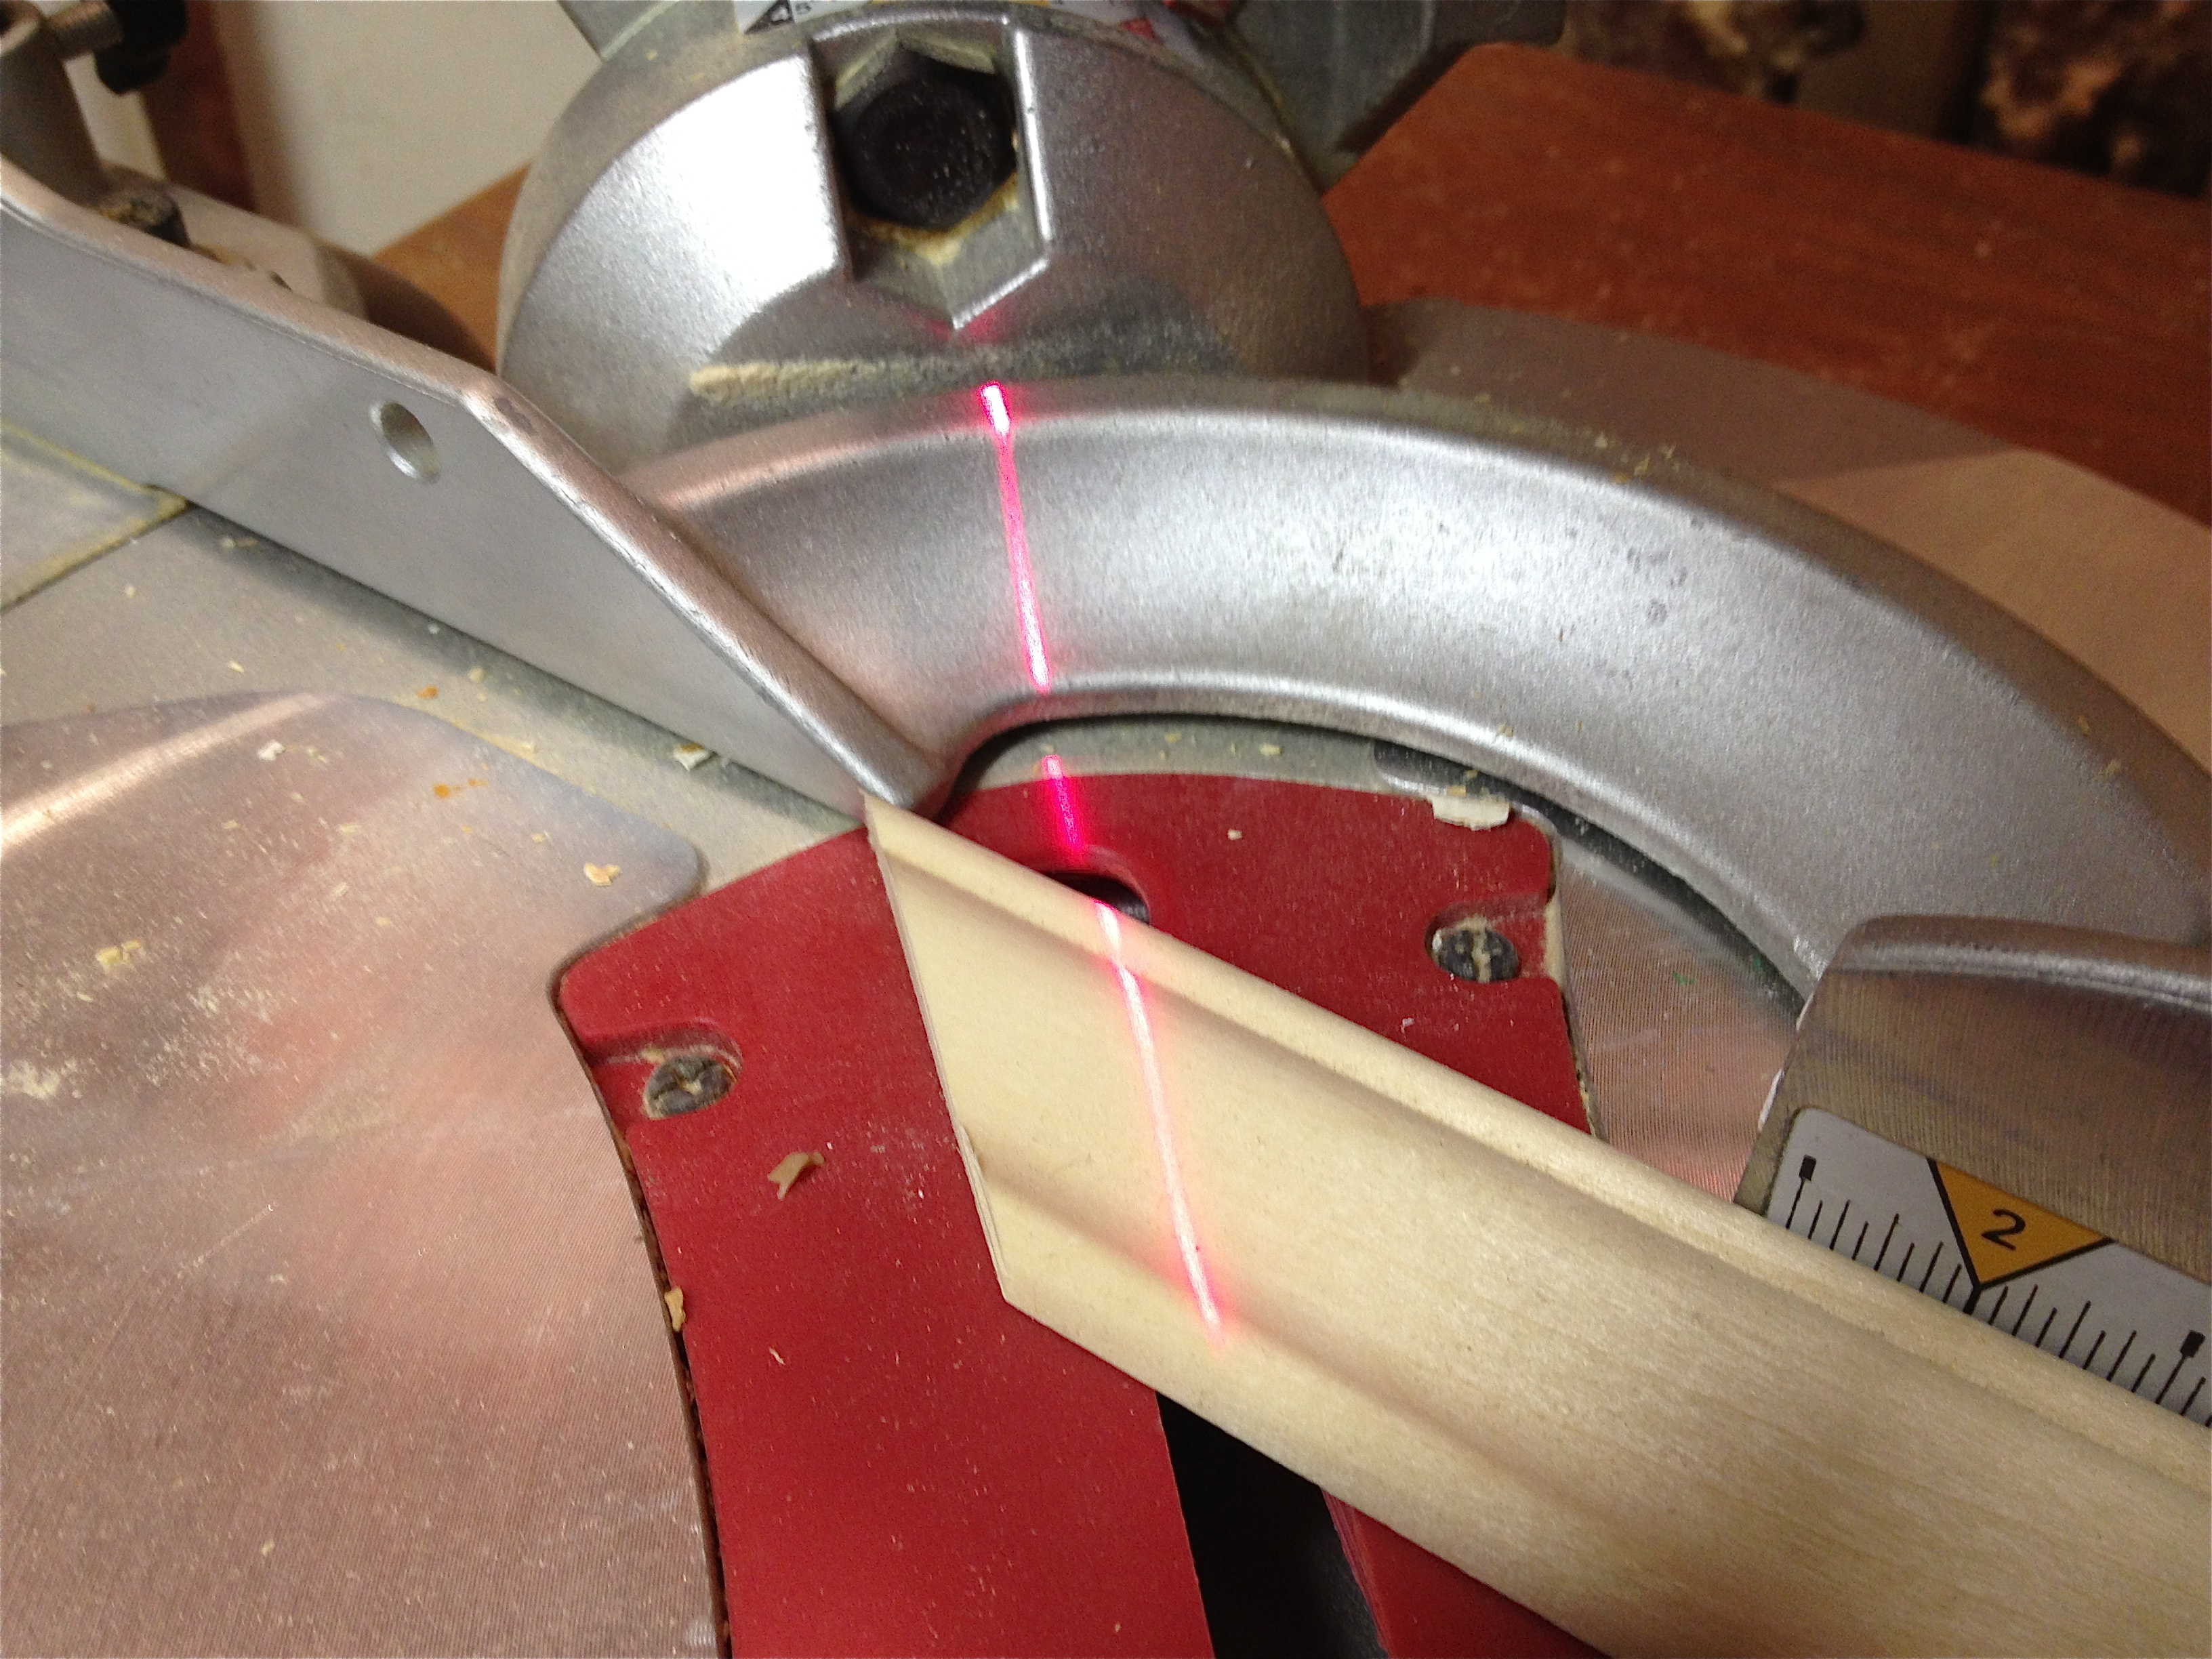
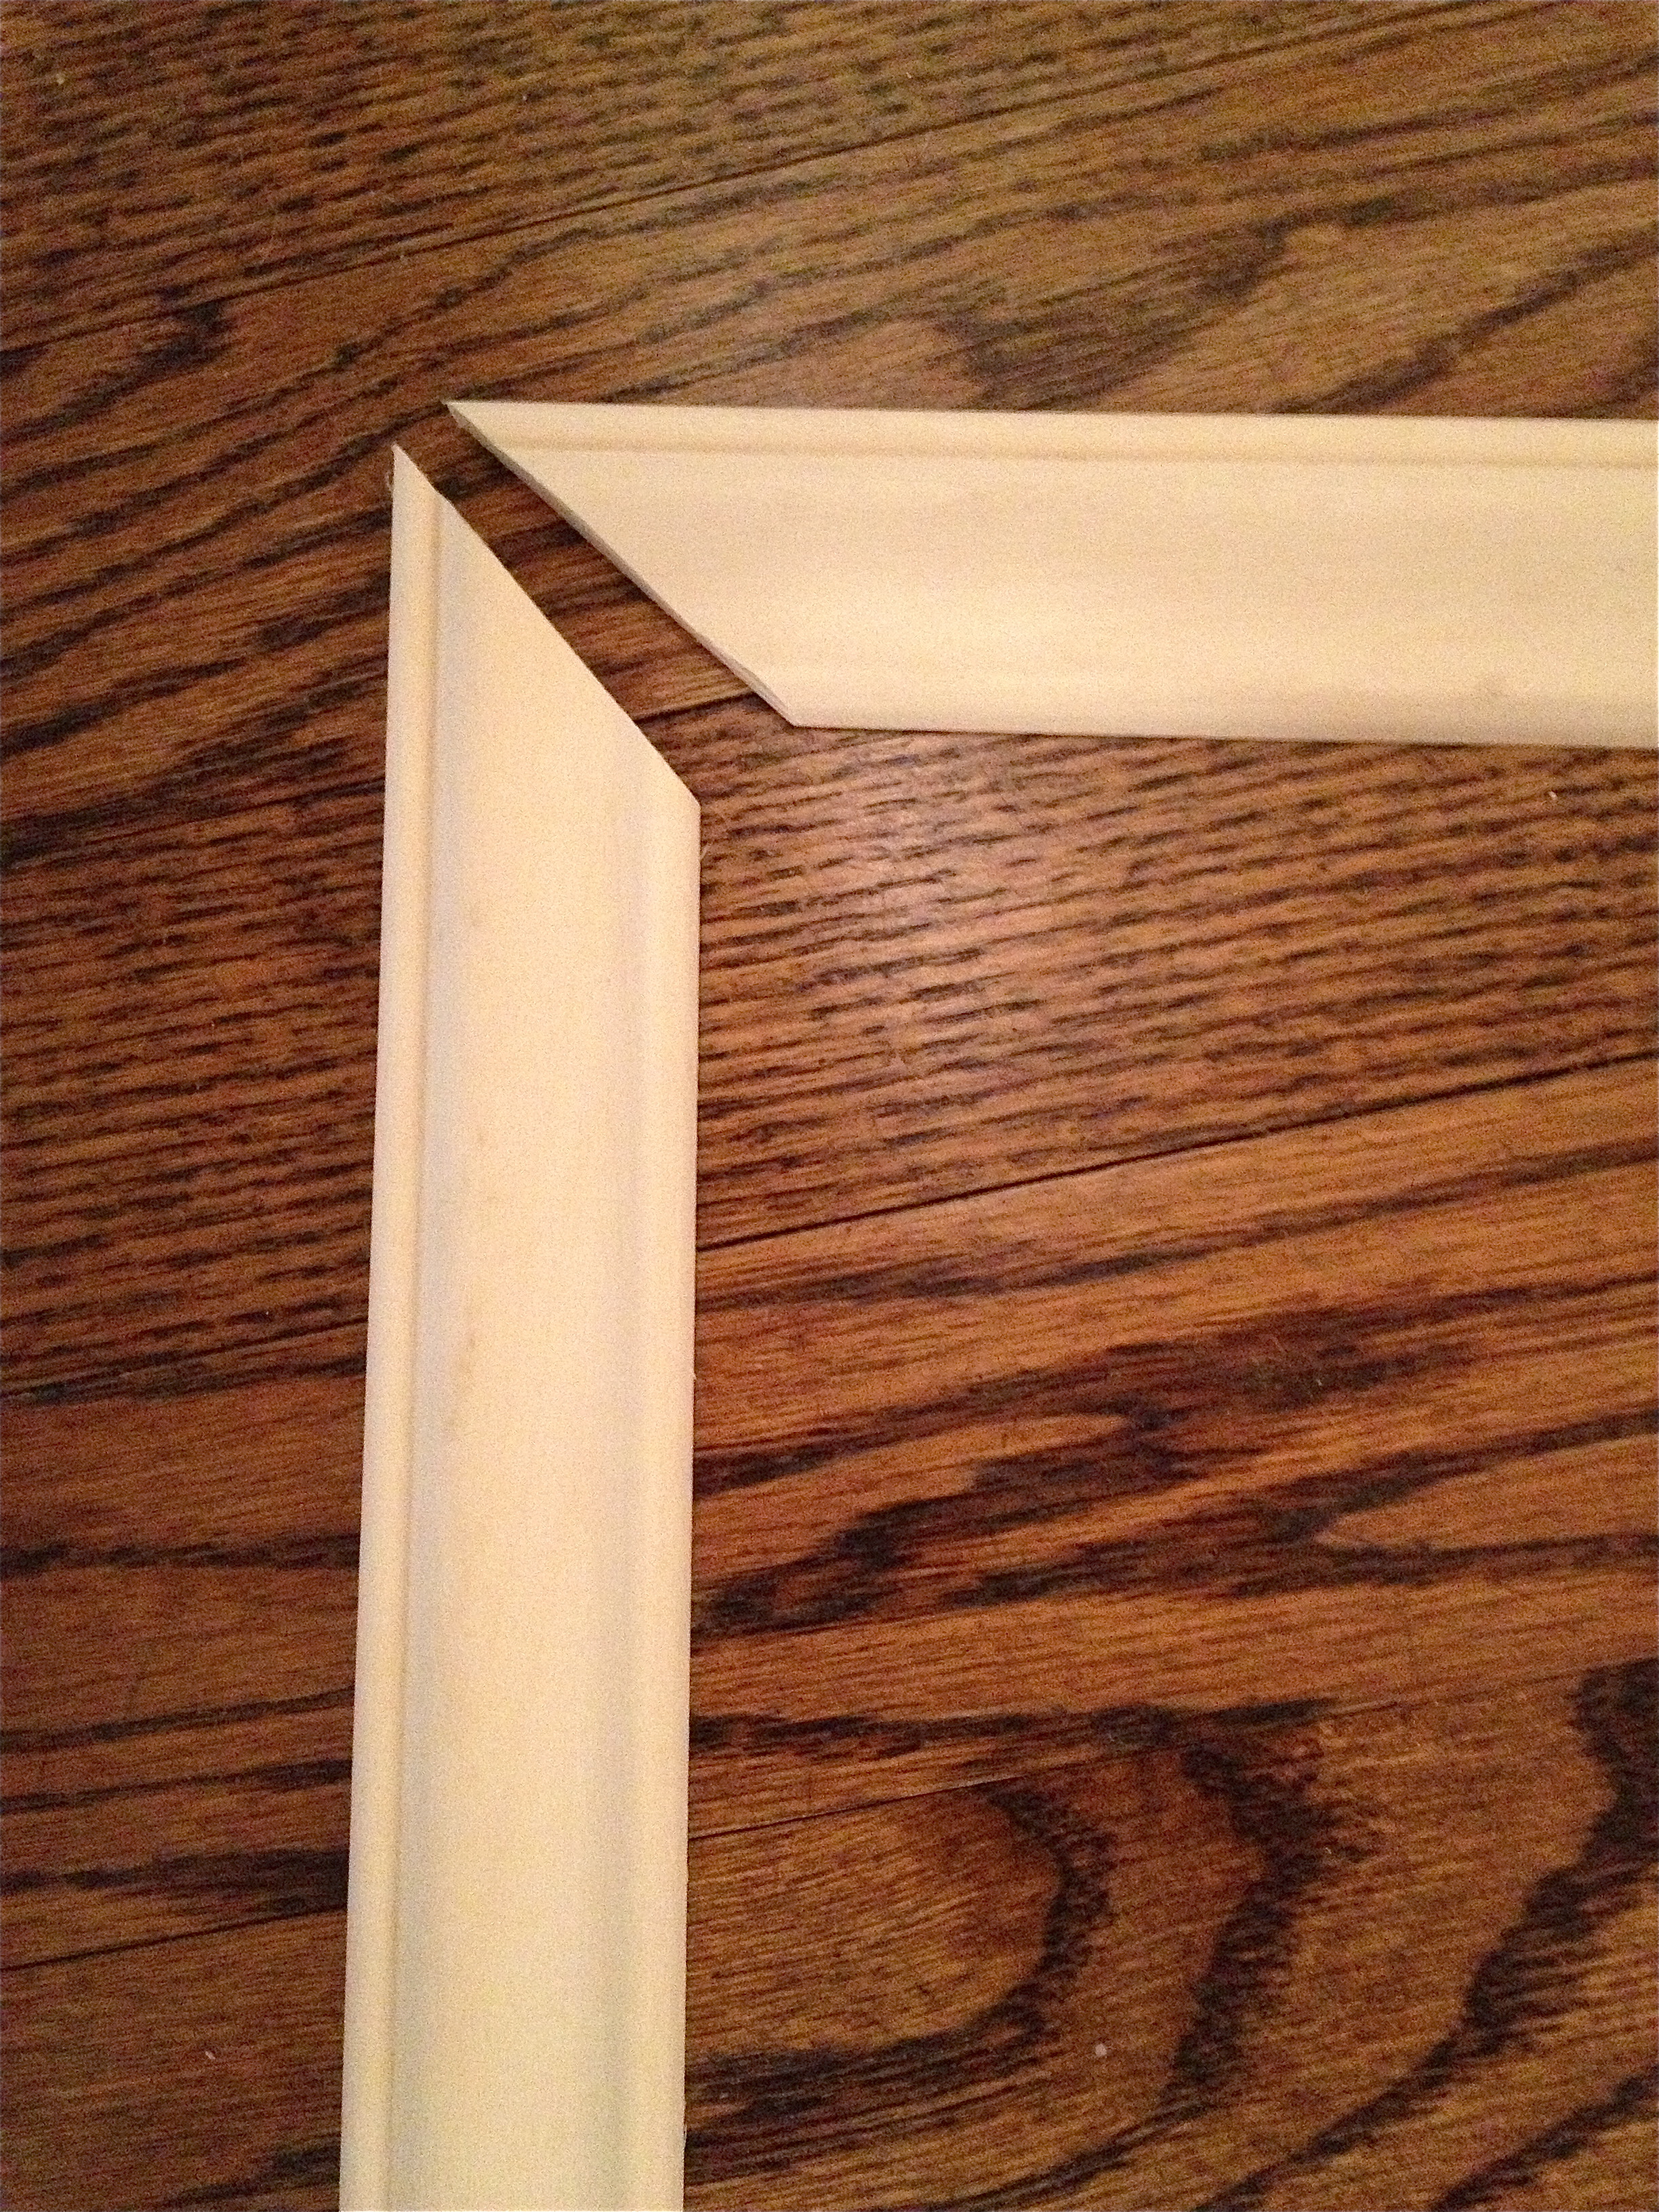
Using 1.5 inch trim moulding, I miter cut the ends at a 45-degree angle, forming picture frame boxes.

photophoto

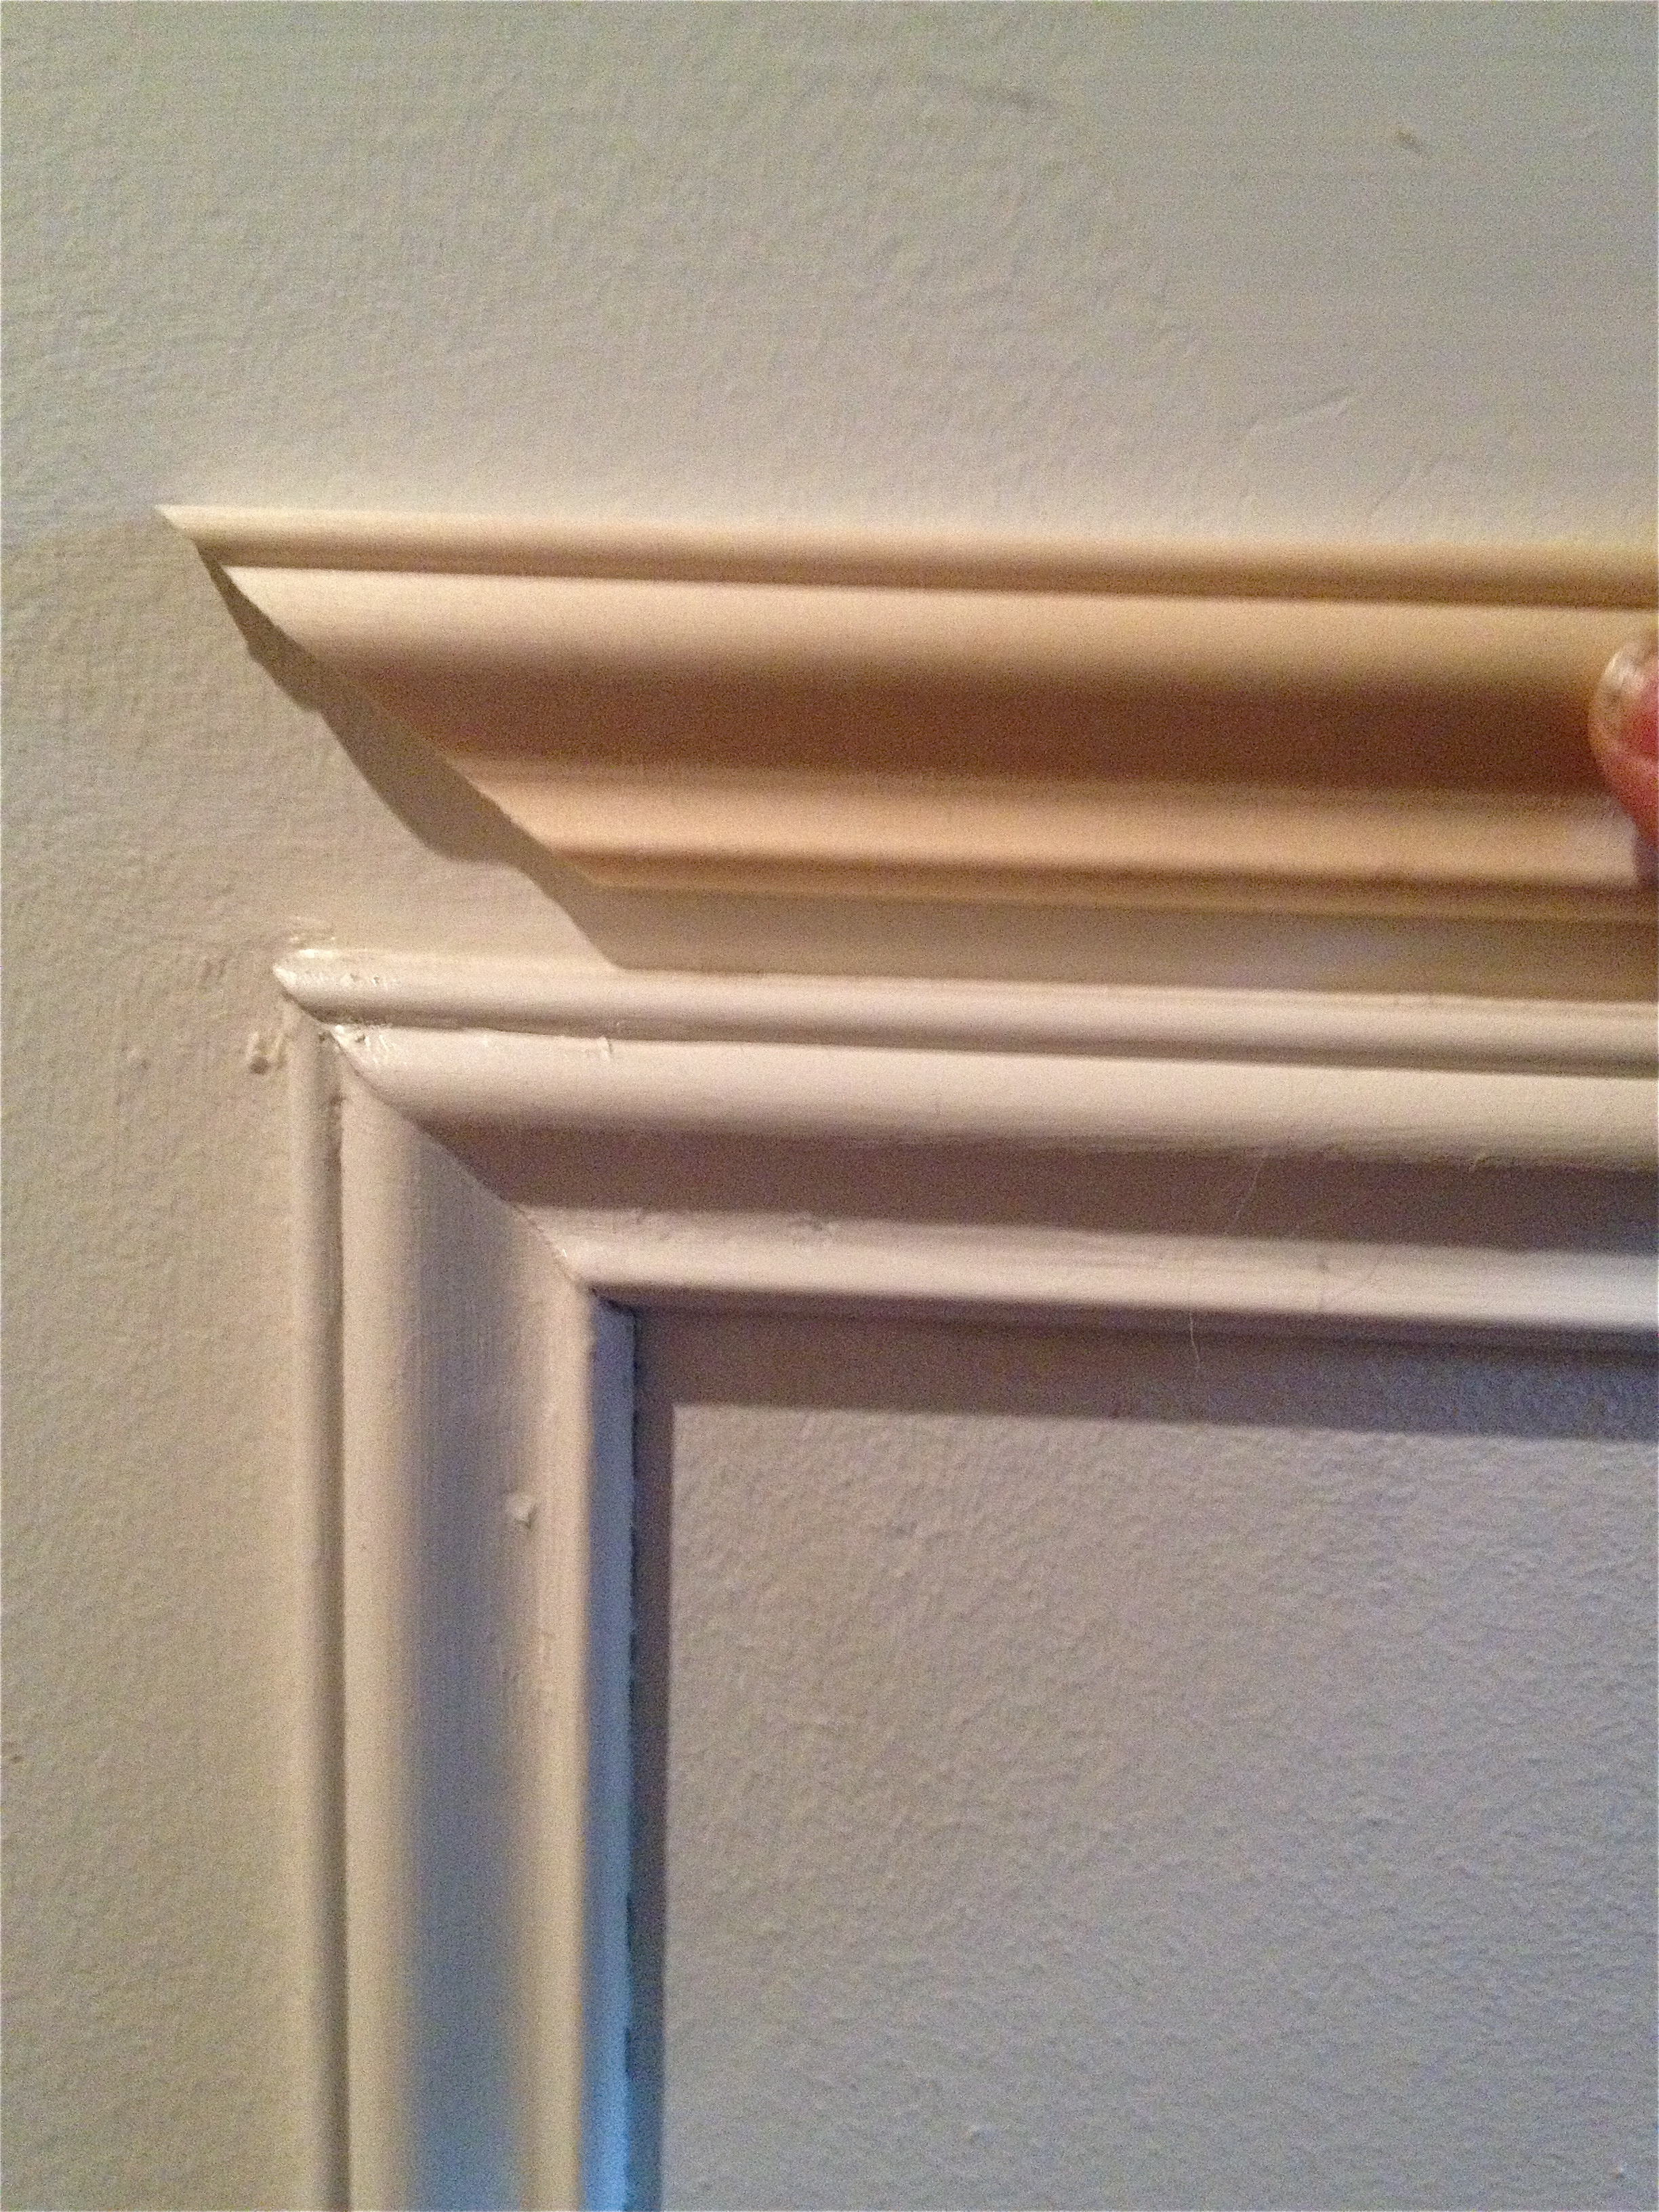
These trim pieces were placed on the wall with liquid nails and finishing nails, using the pencil-drawn boxes as a guide.

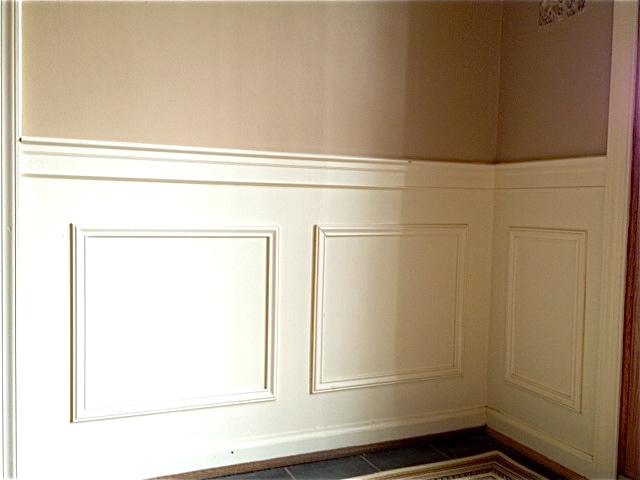
The picture-frame boxes provide the optical illusion of raised wainscot panels.

photo_3

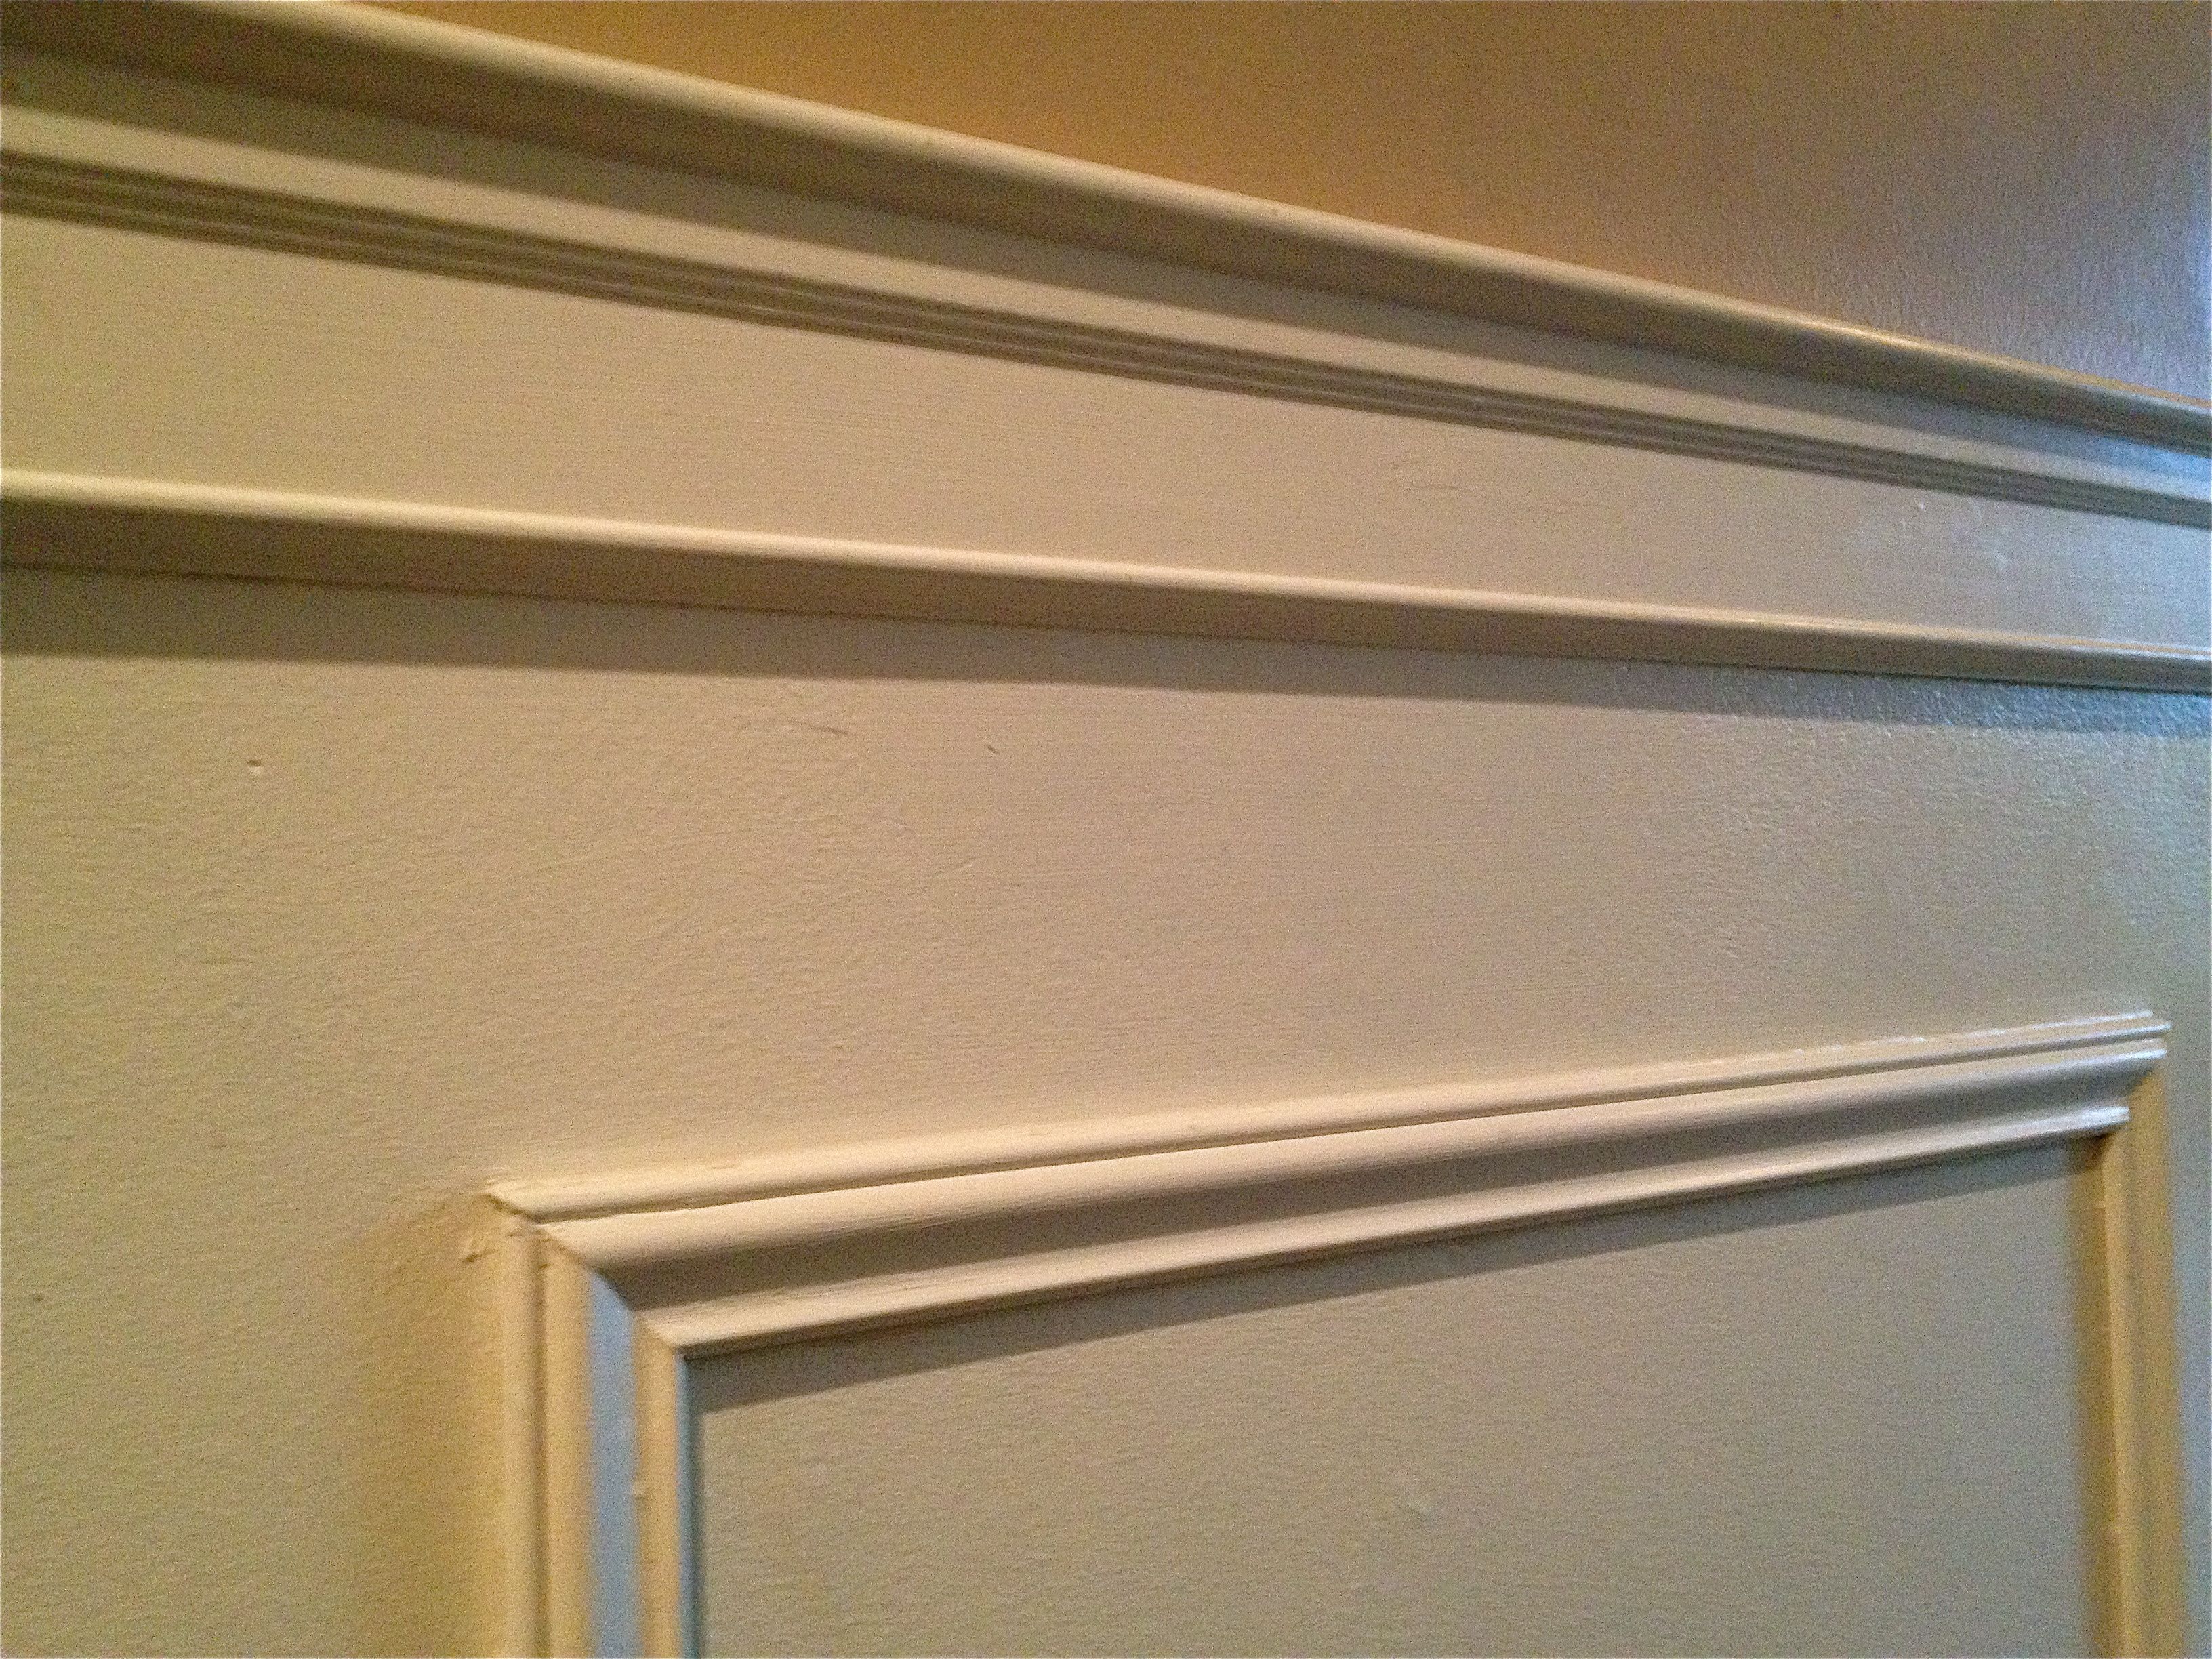
I painted the chair rail and wainscot portion of the wall in Linen White, providing contrast to the taupe wall above.

IMG_1591

IMG_1586

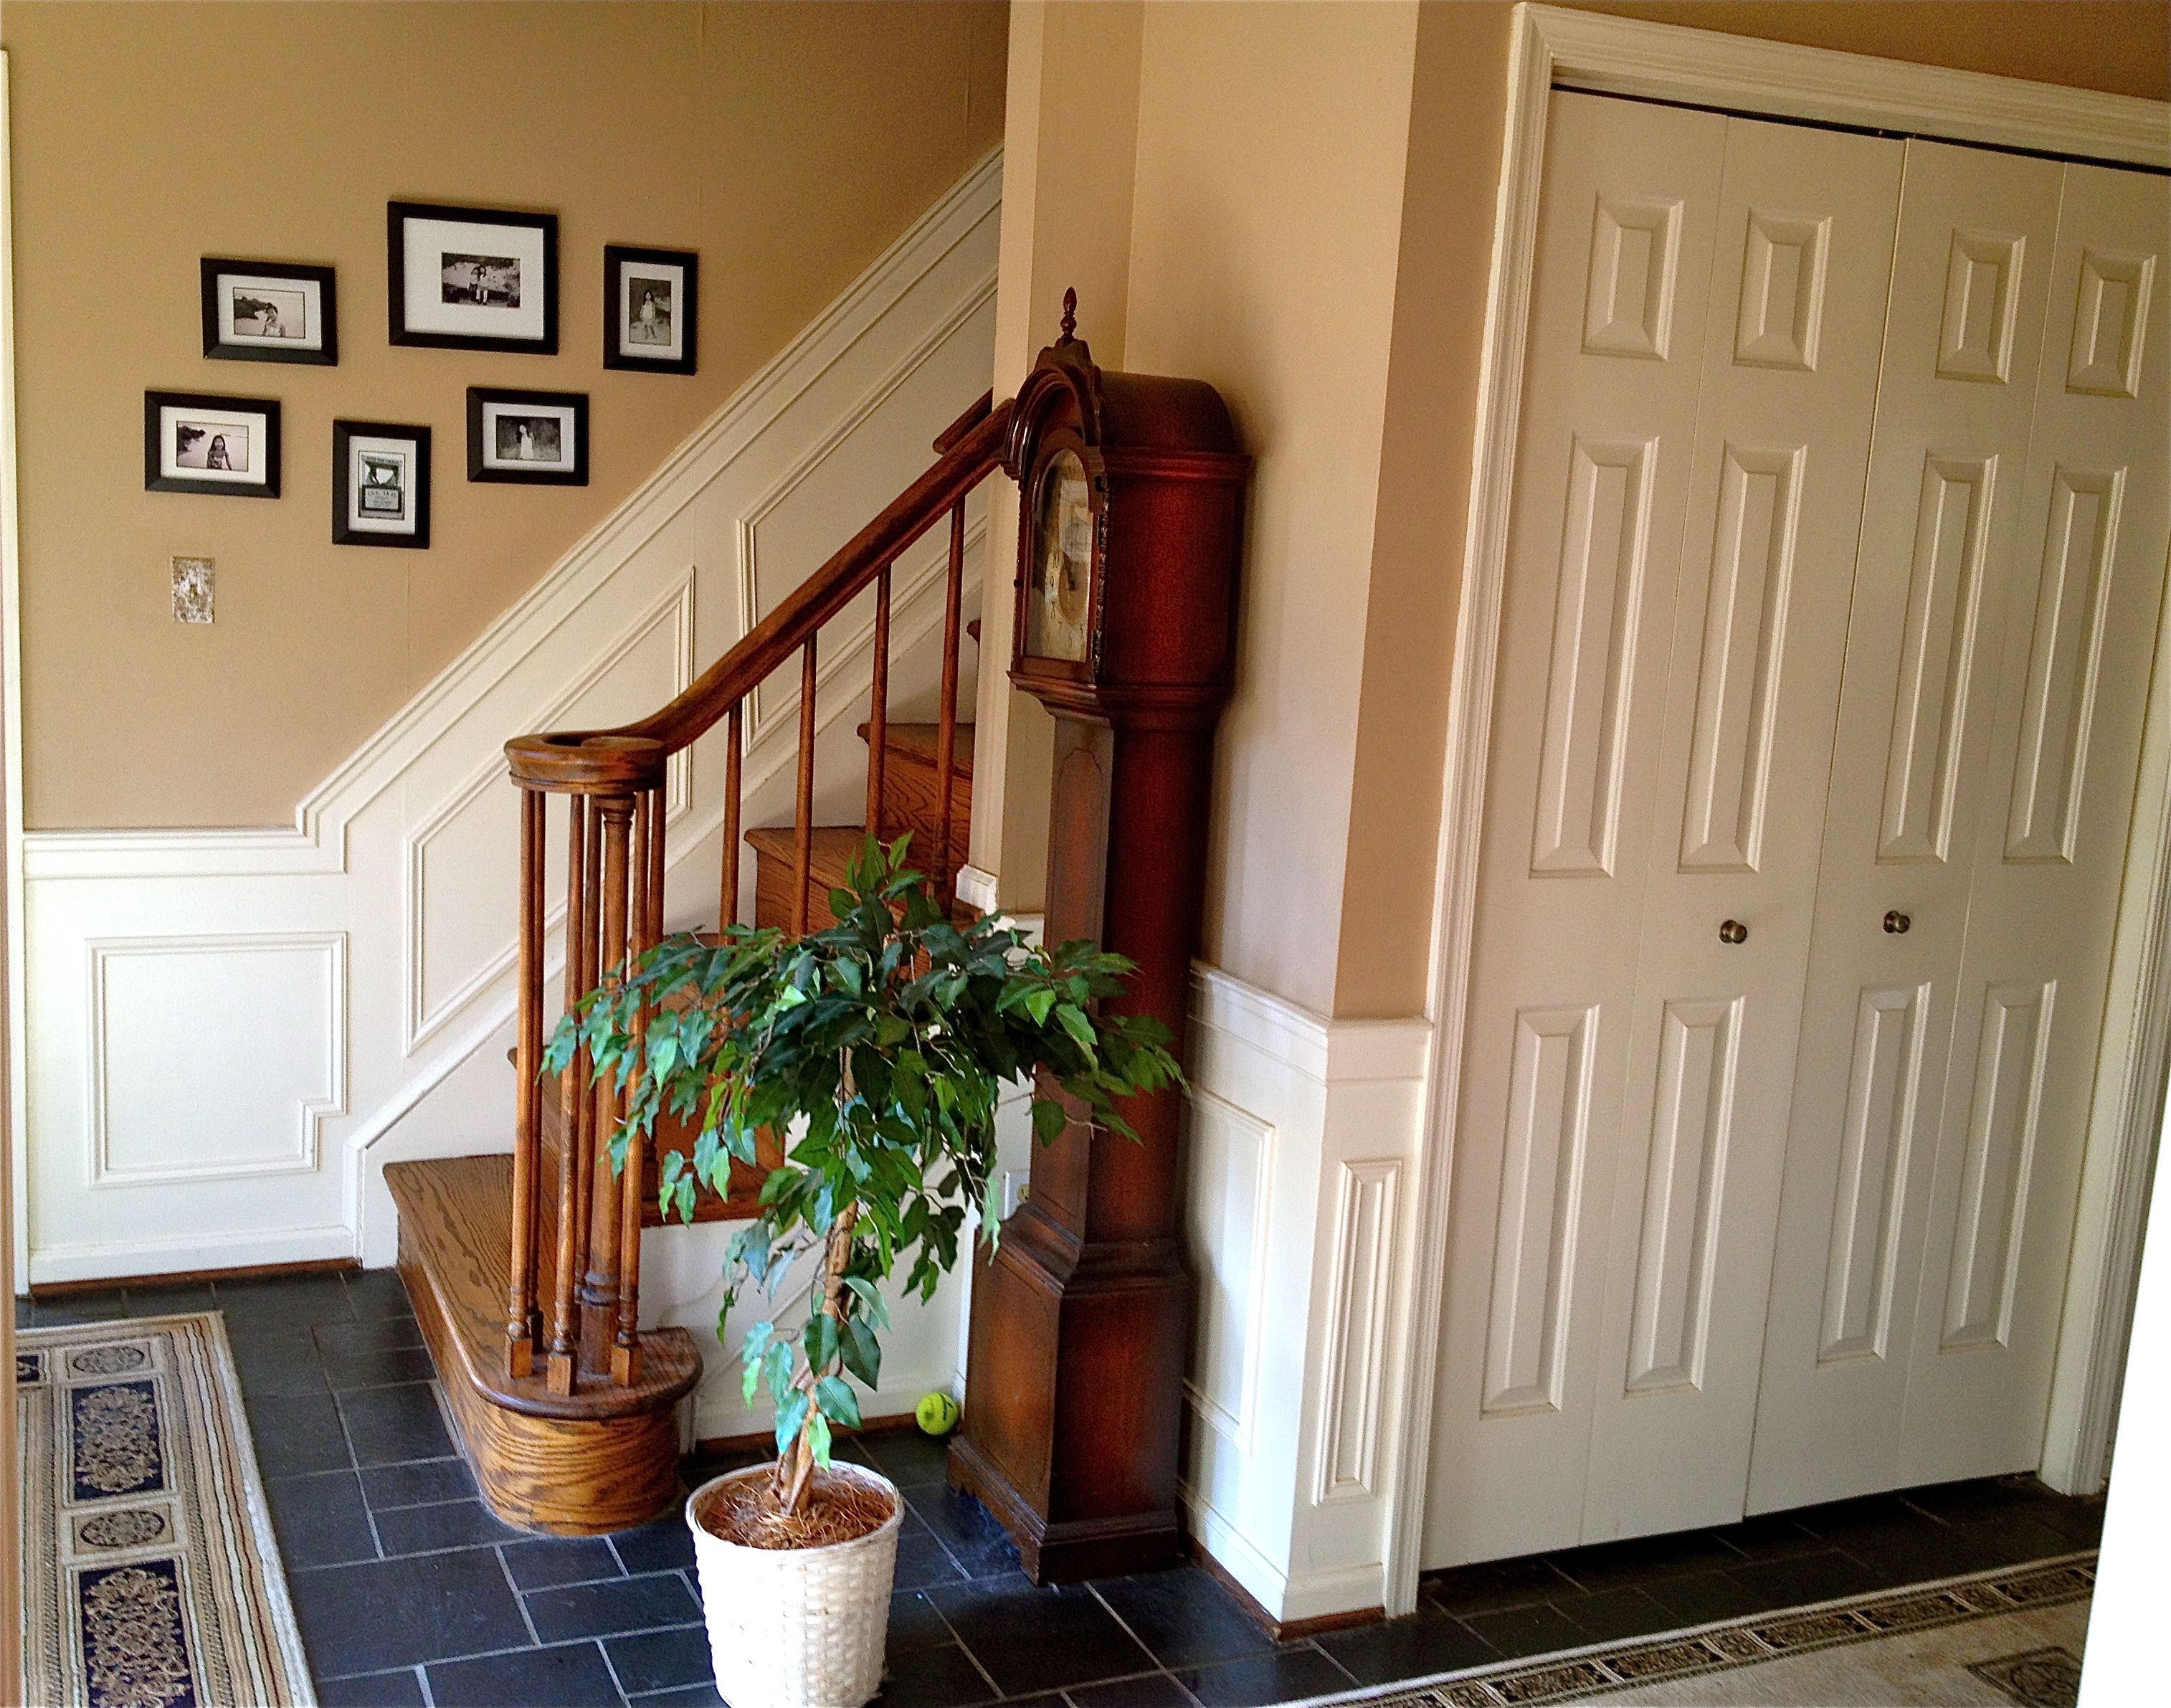
The finished foyer, in all its formal flair. Happy Holidays!

Stainless Steel Paint

Standard

My husband is one of 8 children, so every 7 years it is our turn to host Thanksgiving. We’re up this year but our oven wasn’t. Sure it worked and could roast a turkey, but it wasn’t….pretty. The wall oven is over 15 years old and it is indestructible. While all of the other appliances in the kitchen had broken down and been replaced with shiny new stainless models, the white and tinted-glass oven stood firmly in the wall, refusing to budge, break or give up. I hated it and concocted sneaky ways to “break” it…until I watched an episode of Cool Tools on the DIY Network. I realized I could camouflage it and force it to match its shiny kitchen counterparts. All I needed was an afternoon and my new best friend, Stainless Steel paint. Continue to see the Before and After>

Low-Voltage Lighting Equals High-Voltage Wow!

Standard

“… all the world will be in love with night
And pay no worship to the garish sun…”

William Shakespeare, Romeo and Juliet

Nightscaping.  Exterior Illumination.  Whatever you call it, low-voltage lights can add some serious impact to your outdoor landscape.  The idea to add landscape lights to our gardens germinated after I took down all of the outdoor Christmas decorations.  I missed the colorful lights strung through the bushes and the glow of the floodlight on our Christmas-wreathed front door.  Afterwards, the yard looked so boring—and dark!  Unwilling to fork out the big bucks for a professional yard illumination, I scoured the Internet and found tons of information on how economically and easily you could accomplish this job yourself. So, I did it myself.  Here’s how.

IMG_2477

Floodlights illuminate ornamental trees

First, I took stock of the yard and determined where I wanted lights. Continue reading>

A Quick and Dirty Flagstone Patio

Standard

Our backyard garden has grown over the years from a simple border to a curving arc that blossoms from spring to fall with roses, brown-eyed susans, and purple sage.  Colorful songbirds visit the feeders and stone bath.  The problem?  We wanted to be in the garden, not enjoying it from afar or through a window.  The solution?  We added a flagstone patio, nestled right into the curve of the garden.  And we did it in a day. Sort of.

IMG_2464 - Version 2

After perusing images of flagstone patios on the Internet, we decided that we wanted our stones to be separated so grass could grow between the stones. We took a trip to a local rock center and bought a pallet of large flagstone, which was delivered the very next day. -Continue Reading>

Formica to Fabulous: Tiling a Glass Mosaic Countertop

Standard

The Formica countertop in my daughters’ bathroom had to go…that much was clear.  Getting two teenaged girls to agree on its replacement was another matter indeed.  Granite? Tile? And what about color??  In the end, their mutual love of the ocean and all things seashore provided the answer: sea glass.  We all fell in love with a glass tile mosaic entitled Caribbean Glass with its swirls of blues, greens, and sand.  And here’s how I installed it…right over that ugly Formica.

Before

Before

After

After

The tile we chose comes in a 12×12 inch square, with individual tiles glued onto a net backing.  This makes it simple to cut out and remove tiles as needed. Continue reading

Not Your Traditional TV Stand

Standard

With no offense meant to the makers of particleboard and tinted glass, I abhor TV stands. Perhaps it’s because I came of age in the 70s and 80s…the era of the gigantic “entertainment units” that housed televisions, rack stereo systems, plus speakers and took up an entire wall of the house. Due to this somewhat irrational hatred, I’ve had to get creative with finding homes on which our televisions can perch. My trusted resale and antique shops have once again come to the rescue.

IMG_2202

The bottom half of a corner cupboard serves as the perfect TV stand in our sunroom.  It tucks neatly away into the corner of the room, shrinking the dominance of the TV. Continue reading

How to Build a Garden Waterfall Pond

Standard

“The voice of the sea speaks to the soul.” 

Kate Chopin, The Awakening

The trickling sound of water hitting rock mesmerizes me. Its constancy lulls and soothes. Since our home down the shore isn’t quite close enough to hear the crash of the ocean waves on the beach, we opted for the next best thing. We decided to add a pond to our small garden off the front porch, complete with a trickling waterfall over rock. Here’s how we did it, and you can do it, too.

IMG_2061 Continue reading

Vintage Finds for the Garden

Standard

“If you look the right way, you can see that the whole world is a garden.”

Frances Hodgson Burnett, The Secret Garden

Patios and small garden spaces can pose a problem or a goldmine for the creative gardener. We have a small brick patio leading to the back door of our home, and I was bored with simply lining it with container plants each Spring. A trip to a local resale/salvage yard proffered some (inexpensive) vintage finds that added varying height, color, and interest to my patio “garden.”

Here’s the mishmash of what I brought home one day for under $35:

DSC00918

My haul included two tables, an old toolbox, and a window.  I liked the colors and the varying heights of the pieces as well as the weathered and chipped paint.  The only work needed was to clean them a bit and decide how to use them. Continue reading

Haint Paint

Standard

On a trip to the charming city of Charleston, I became a fan of “haint” paint. “Haint” is southern slang for “haunt,” and legend holds that painting a porch ceiling in a lovely shade of blue will guard your home against evil spirits. Many swear it also wards off insects! While I unfortunately don’t have the charming wrap-around porch that graces many a Charleston home, I employed the concept of “haint paint” to help transform my dark family room to more of a beachy, cottage look. Keep reading to see The Before and After…

Family Room Rehab

Standard

Our family room was a cave. 1970s dark wood paneling covered the walls and the bookcases that flanked the pinkish brick fireplace. It was a look stolen right from the set of The Brady Bunch. I dreamed of revamping the room to reflect my favorite place on earth–Ocean City, NJ. The task seemed monumental.  Tear out the walls and start from studs?  Reface the horrid brick of the fireplace?  Dollar signs danced before my eyes.  In the end, all that was needed was a little paint and a lot of elbow grease.

Scan_2

I opted to keep the paneling on the walls and paint over it.  First, I “washed” the walls with Liquid Sandpaper to remove any dirt and wax.  It took a first coat of heavy duty primer and 3 additional coats of white paint (Benjamin Moore’s Atrium White in an eggshell finish) to cover the dark wood.  I used a roller to apply the first primer coat, but every seam between each panel had to be painted with a brush for full coverage. The tedious work was worth it–the painted paneling looks like bead board, contributing to the desired beach cottage atmosphere.

IMG_0701


IMG_0714


Next, I tackled the fireplace.  I scrubbed the brick with a wire brush and detergent to remove any grime.  A thorough vacuuming removed any lingering dust.  The same routine of primer and 3 coats of paint (same color but a semi-gloss finish) covered the brick.  I learned my lesson from the painstaking chore of painting over each panel seam by hand and used a heavy-knap roller for the fireplace.  Much better coverage!

I’ll chat about how the room got the blues in my next post…

Beach Cottage Family Room

Beach Cottage Family Room

Powder Room Pebbles

Standard

“The beauty of Zen is found in simplicity and tranquility, in a sense of the all-embracing harmony of things.”

~ Thich Thien-An

Zen. Tranquil. Simple. This was the state I was trying to achieve when I remodeled our downstairs bathroom. Less was more, and I didn’t want to clutter the small room. However, I still desired a certain pop. A floor-to-ceiling pebble wall instead of a traditional tile backsplash achieved all of these goals.

Pebble tile is available at most tile stores and online as well. Pebble tile is sold as a mosaic, with individual pebble stones attached to a mesh backing, usually in 12×12 squares. The edges are patterned to fit together like interlocking puzzle pieces–what could be simpler? Continue reading

Throwback Doorknob

Standard

Here’s a quick and easy way to add some character to an ordinary modern door–replace the builder’s grade doorknob with a vintage crystal knob.  Crystal knobs can be easily found in resale shops, stores like Anthropologie, even at Home Depot.

Image

Like all good things, however, it’s a bit trickier than simply swapping one knob out for the other. Vintage knobs have a square stem rather than the half-moon shaped stem of modern knobs. This requires a mortise latch bolt, which can be easily and cheaply found on the Internet (I purchased mine from Home Depot for under $10). Additionally, older doors are typically solid wood and thicker than most modern doors; hence, the knob’s stem is often too long. Continue reading

Add Some Fire to the Bedroom

Standard

I’ve always dreamed of falling asleep to the crackle of a roaring fire. Nothing screams romantic B & B like a fireplace in the bedroom. Alas, no such luxury existed in our bedroom, though that is not to say that sparks don’t occasionally fly in the master suite.

IMG_1596

A chance sighting of a vintage mantle in a local salvage yard brought my dream to life. Sort of. I bought the piece and sanded it down to remove the worn, chipped paint. I repainted it, then did some sanding of my own to add the character back into the mantle. Continue reading